Crafting is a hobby that requires a dedicated space. For those lucky enough to have an extra room or nook in their home, what better way to fill that space than to turn it into a crafting area? You’ll probably already have several things on hand that you can use to start organizing your space, and any DIYer knows the importance of keeping their supplies and space organized with proper craft supply storage. From sewing to gift wrap, papercrafts, and more—whether you’re a craft connoisseur or novice, we’ve got just the tips to make the most of your creative space.
1. Start With a Desk
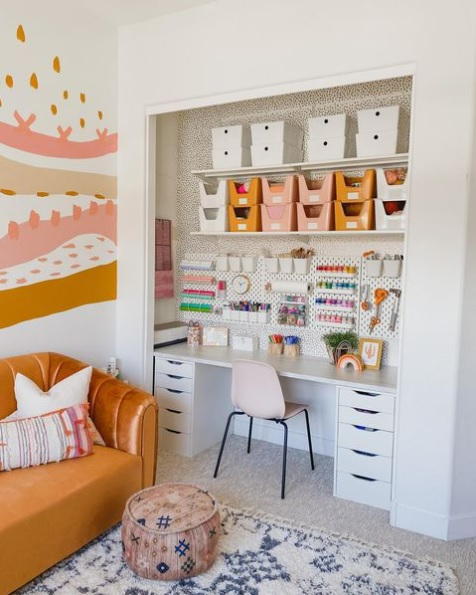
First and foremost, you’ll need to set your workspace up with a suitable desk. The size of the desk will depend on how much room you have to work with (so make sure you measure) and what the desk will be used for. Will it need to fit a sewing machine or a Cricut? Should it be adjustable like a drawing easel? Or will it need to fit a large hutch with lots of shelving space? Some even come with built-in drawers and shelves or are portable, so you can move them around as needed. Our favorite is the space-saving Dreambox armoire, which is customizable and has a built-in desk and shelving galore. The best part is this piece takes up mainly vertical space, so it can fit in pretty much any room.
It’s also a great idea to utilize multi-purpose furniture, like combining your home office with your craft room. A desk is versatile, after all. And if you don’t want all your craft supplies sharing a space with your office supplies, you can separate them into different cabinets, bookcases, or cubbies.
2. Tack On Shelves, Counters, and Storage Bins
There’s no such thing as too many shelves when it comes to crafting. If you select a smaller desk for a small space, enhance it by taking advantage of wall space. Implementing floating shelving units or even a peg board can help compensate for a lack of furniture storage, and you can lay them out however you need.
On the other hand, if you’re blessed with a larger working area, installing countertops can allow for more than one workstation if you have several projects or multiple people sharing the space. Countertops can also be used to split your workspace into different zones, depending on your interests and needs. For example, one zone could hold your computer and be solely for digital work, while another is used for painting or sewing.
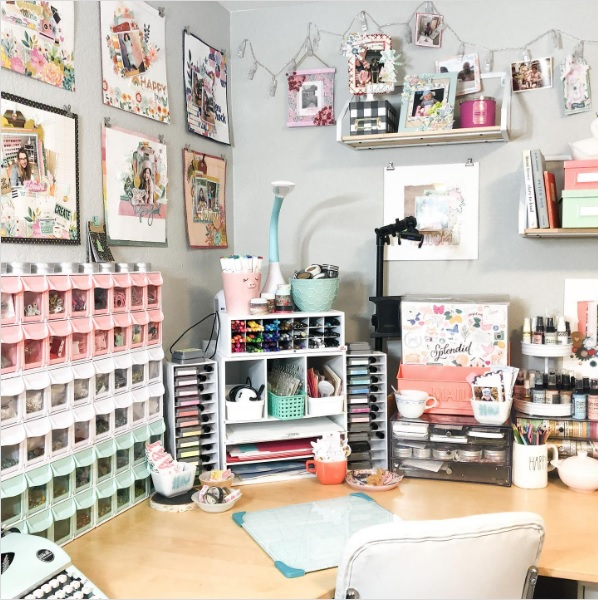
No matter what workspace setup you choose, you’ll also need plenty of storage containers to keep all your supplies organized. The most recommended style is clear storage bins, jars, or drawer organizers so you can easily see the contents, but no worries if that’s not what you go with. Tips three and four offer a workaround. Take inventory of what you have to determine how many storage bins you’ll need and what sizes will work best. When organizing your craft room, just keep in mind you’ll want to place the supplies you use the most front and center, so they’re more accessible.
3. Color Code Your Supplies
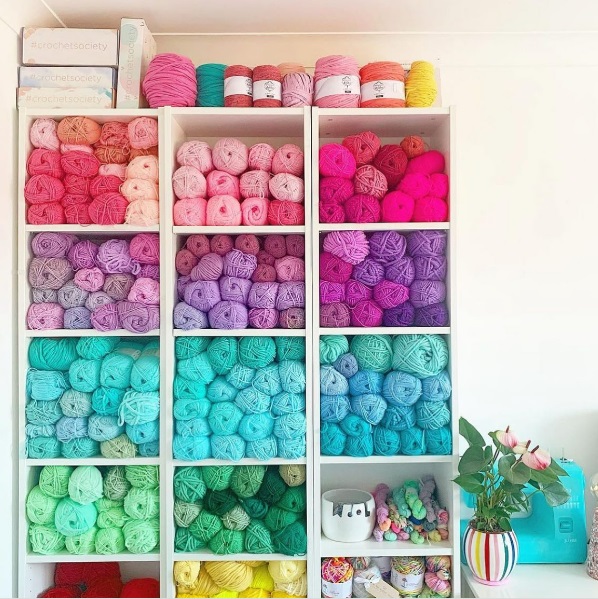
While on the topic of craft room storage containers, when it comes time to organize your supplies in your new space, you’ll not only want to separate them by purpose. Color coding is extremely useful when you’re working with a lot of supplies and makes it far easier to grab what you need. You can use different colored bins for different purposes, like scrapbook paper versus sticker paper.
You can also color code the supplies themselves. For example, color coding your yarn, beads, or paint means you can quickly spot the color you’re looking for mid-project, so you don’t have to waste time sifting through different containers. When you take the time to organize your craft supplies, it’ll also make the space look nicer and more put together. There are hundreds of craft room organization ideas out there, so use the methods that work best for you.
4. Go Label Crazy
A favorite step for any DIYer who gets a little trigger-happy with a label maker. As you separate your supplies into bins, be sure to customize and label them. This is especially handy if you aren’t working with clear storage containers, as mentioned above, or if you easily forget what you have on hand. You can make the labels as simple or elaborate as you’d like.
Creating your own sticker labels via Cricut Design Space can be a fun little project in and of itself. And if you want to be able to move things around or swap out supplies between projects, give reusable vinyl labels or erasable chalkboard labels a try. For example, you might set your workspace up differently during the holidays and need to change out your watercolors for your ribbon and tags.
5. Install Bright Lighting
You can’t go wrong with natural light, but sometimes that isn’t enough. Avoid eye strain or accidents by installing extra light sources around your workspace. Whether it’s a desk lamp, floor lamp, or ceiling fixture is up to your tastes and the room you’re working with. A window is great on a clear day, especially if you take photos of your work. However, it’s not a reliable light source on a cloudy day or come sundown. Some of us are night owls and find our best inspiration after hours.
6. Decorate the Space
While you don’t want to overdo it and make your craft area cluttered, adding some décor to the space can be uplifting and inspiring. Hang eye-catching wall art, photos, personal projects you’re proud of, or even a bulletin board you can pin ideas to. Bring nature inside with some houseplants (as long as they won’t get in the way and have access to sunlight). You can also paint a mural to really add your own personal touch. Curate the space however you like and in a way that will enable your creativity rather than hinder it.
7. Store Your Supplies and Projects Between Creative Sessions
Maybe you’re a DIY expert who jumps from one project to the next for their blog or YouTube series, or maybe you’ve got a small apartment with limited space to contain all your creativity. Whatever your reasons, if you need more storage space for your craft supplies or finished projects, give self storage a try.
Prime has storage facilities across the country—chances are there’s a location near you. Looking to store your painting supplies, artwork, fabrics, or anything else that might not hold up in extreme heat or cold? Check out climate controlled storage options at select facilities. We also have convenient drive-up units at many locations, which are perfect for storing bulkier items or anything that isn’t temperature-sensitive. So you can find the perfect space for your things when you need to.